Showing posts with label Binders. Show all posts

1/2/15

Organizing Christmas Cards: Family & Friends Photo Album

I'm like a little kid in a candy shop, when it comes to getting my mail every year, during the month of December. Why? because I LOVE to get Christmas cards from my family and friends.  

For the last couple of years, I display them in my home on a photo board and a little sleigh during the Christmas season.  I showed you that back in 2013 and gave you some more ideas on how to display Christmas cards in that post too.

Once the Christmas Decor comes down, I take those photo cards and add them to a family and friends photo album that I created a couple of years back:


It's just a simple black 3 ring photo album and I use peel and stick pages for the inside.


I created a family & friends sign for the first page...


... and I add a 4 x 6 print with the year on it,  just before adding new pictures.

here are some the inside pages


Not only do I put Christmas card photo's into these albums, I also add photo's, birth announcements and more to the album, throughout the year, after they've been on my photo display board for a while.


This is the photo board that I have in my kitchen.   This is a fairly new piece that I made.  I made it with a large frame and I just stapled chicken wire to the back of the frame.

I use little clothespins from Walmart to hang the photos.

And then after they've been up for a while, I add them to the family and friends photo album:


I've been doing this now for a couple of years and I love this little system!  It's fun to look back through the years.

How about you? Do you keep your photo Christmas cards each year?  How do you organize them?


May you be a little inspired!
Until next time,
DaNita 
 . . . . . . . . . . . . . . . . . . . . . . . . . . . . . . . . . . . . . . . . . . . . . . . . . .

View more of my Most Recent Projects HERE.
 

8/15/13

Back to School Home Organization Ideas

With summer coming to (an all too soon) end and school days fast approaching, I like to feel organized and ready to get back to schedules and such.

Here's a list of back to school organization ideas that you may like to apply to your home & life.
Create a Children's Homework Message Center with the 16x20 Red Damask Child Message Center or choose a different design from my Etsy Shop (there are many to choose from.)

 DIY Backpack Holder Wall Hooks

  Create a Homework Desk Area

Organize Children's School Lunches

Time Saving Tips for School Mornings

 Find a spot to hang the lunch boxes.  I have the perfect wall for that in my pantry.

Another thing that we do in our home is Chores.  Each of my boys have their own chores chart and we use it every. single.day.  During the school year, right after school my boys get a snack and are expected to get their chores done right after that.

I am a firm believer that chores are good for children.  It has seriously made our daily clean-up so much easier and there is never a question on who has to do what.

I have many chores charts in my SHOP.

Our  chore charts sit in my Back Entrance Storage Cubbies:
Wondering what to do with all those school papers that your child will be taking home in a few short weeks?  If so, you'll want to check out:
 Organize Children's School Papers


The 8 1/2 x 11 School Days Form printable page is available in my shop too.

Doing a 12 x 12 scrapbook for your child? 
This is the perfect school days pre-made scrapbook page.

Are you into project life scrap-booking?  I've been getting into doing this and I love it!!
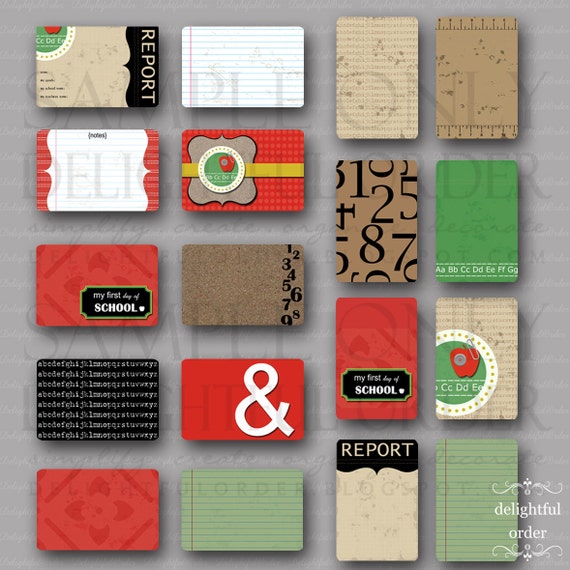
I designed the School Days Too - 4x6 Journal Cards and have been using these for my boys now.  One of these days I'll show you some of my scrapbook/photo albums. I'm totally addicted! and I'm loving these journal cards!  I have a photo printer at home, so I just print the individual 4x6 journal cards at home, but you can have any photo lab print them for personal use only.  They turn out so cute!

or... you can create an entire 3-ring binder for those school papers, like I did last year:
Simply print this entire printable school days memory book packet from my Etsy Shop and add them to any 3-ring binder.
There's a Boys School Days Memory Book

 and a Girls School Days Memory Book


Want to see even more ways to organize your home?  View all my organizing posts {HERE.}

So that's it for today. Tell me, are you feeling inspired to get some back to school home organization projects complete?  Are you ready to send your children back to school?

May you be a little inspired!
Until next time,
DaNita 
 . . . . . . . . . . . . . . . . . . . . . . . . . . . . . . . . . . . . . . . . . . . . . . . . . .

5/8/12

Organizing My Recipe Inspiration

Last week I showed you how I organize my family favorite recipes.  Today, I’m sharing  how I organize my recipe inspiration.  I’m talking about those recipes that one spots and says “mmmm… that sounds yummy, I think I’ll make that someday.”  So how does one keep track of all those different recipes?

Me, well when I find a recipe online, I PIN it to Pinterest, under the recipe category. Simple as that.  When I’m looking for a different recipe to make, first I go to this binder that you're about to see, next I go looking on my pinterest.  If I decide to try it that week, I print the recipe. If I think it’s a keeper, it may possibly be transferred onto my recipe cards and added to our family favorite binder, which is the spot I go looking first while I plan our meals for the week. 

With all those recipes that I spot in a magazine or book, I tear them out, or make a copy of them, depending on the magazine or book.  To keep them all organized I use another binder that looks just like the favorites binder.
I used the same printable package that is available to purchase in my shop:

click the image above to be directed to this item in the shop.

but with a different cover page. 
the tabs are the same.  Those are part of the printable pack. Simply print, cut-out, fold and staple on.
I created a different side label too.
AND the biggest difference with this binder vs. my favorites binder is the inside pages.  My family favorites has recipe cards, protected in 4 x 6 photo sheet protectors.  In this binder, I use full page 3-hole punched sheet protectors (you can find them at any office store.)
mine are from Office Depot.
100_8523
I simply inserted each divided page from the printable set that I created into the sheet protectors.  I laminated the ones in my family favorites binder.
and I actually stapled the tabs directly onto the sheet protectors.
Inside each section, I put recipes that I’ve torn out magazines.
Super easy peasy!
:)
100_8529
or copies of recipes that I’d like to try someday into go into the sheet protectors.
I keep a bunch of extra sheet protector pages in the back of the book, which makes for easy additions.
And that’s it.  I store our Family Favorites Binder and this Recipe Inspirations binder in my baking cabinet next to all of my recipe books.

Do you have a different way of organizing all your recipes that you’d like to try someday?  Or what about those family favorites?  Do share, I’d love to hear from you.

May you be a little inspired!
Until next time,
DaNita

Linking to some of my favorite parties.

5/1/12

Organizing Favorite Recipes & Iced Coffee Punch Recipe

I have a collection of favorite recipes that I’ve been gathering over the years.  If I try a new recipe and it’s a hit with my family, I add it to the favorites.  I’ll show you how I organize my “recipe’s to try” in another post.

Up until now I’ve used a recipe box to organize the recipe cards.  I showed you that box quite a while ago. It’s worked well, but I’ve been wanting to update and change the cards and organizer for a while now and I finally got it done.

Well, I can’t say it’s completely done, because I still have to finish typing all my recipes, which takes a while, BUT I just keep doing a little at a time. Eventually I’ll get them all typed up and added to my new binder.

and this is it!  I just used a white binder that I had on hand and created some printables, which are NOW available as a set in my shop:
Click the image above to be directed to this item in my shop.

I created a side label for the binder too.

Inside my binder looks like so.  I printed and laminated each dividing page and popped holes in the pages with a hole puncher.

I put a matching weekly meal planning page, attached with a binder clip to the inside of the front cover.  This one is also laminated and I just write the menu out for the week with a dry erase marker and wipe off to update it for the next week.

You may remember the other weekly meal planning printable page that I had in my all-in-one family binder.  I’ve used that, until I decided that I would rather have the meal planning along with my recipes.  (I just didn’t want you thinking that I’m doing both.)  Organization in this household is always changing.
The inside of the binder is organized by section.
Appetizers & Beverages
Breads
Breakfast
Dessert
Main Dishes
Crockpot Main Dishes
Soups & Salads
AND Vegetables & Side Dishes
In my Damask Birthday Party Post, I talked about the Iced Coffee Punch recipe in the photo above.  You simply must try it for your next party or get together.  It’s oh SO yummy! and so easy to make:

Hazelnut Iced Coffee Punch
1/2 cup instant coffee (may use decaf)
1 cup sugar
1 cup water
1 pt. hazelnut coffee creamer (liquid) (can use french vanilla too) 
1 gallon milk
3/4 bag ice
1/2 gallon vanilla ice-cream
boil coffee, sugar and water.  in a large jug or bowl, add ice-cream, creamer, ice and milk; then mix coffee, sugar and the water into the jug. ENJOY!
(note: this is not my recipe – I got it from a family & friends recipe book)

Inside each section, I’m using 4 x 6 photo sheet protectors to hold my recipe cards.
I purchased the protectors at Staples and I really like the fact that my recipe cards are protected from food splatters.

I created three different edit-able 4 x 6 recipe cards.  When I get a moment here and there, I sit and type a few recipes in the cards, print them onto cardstock, cut them out and place them into their proper section in the binder.  It’ll take me some time to get them all typed up, but my plan is to have all our favorite recipes typed and in the sheets soon.

The edit-able recipe cards are available in my shop, these are the different options available:


Each listing is separate and you get 2 total files.  One PDF file that you can type in (or cut and paste) your favorite recipe and you also get lined cards as well.  I keep a stack of lined cards in the back of my binder, in case I have to quickly jot down a recipe to add.

I chose to use recipe cards vs. full 8 1/2 x 11 pages, because I tend to change things around quite a bit and if I ever decide to go back to a recipe box, I can simply transfer the cards from the binder to a box.

Take a look at the rest of the inside sections.  I am SO loving these colors right now! :)
Also included in the printable recipe binder organizer packet are tabs for each section. I cut the tabs out, laminated (which you wouldn’t have to) folded the tabs, and stapled them to the 8.5 x 11 sheet. For a little added detail, I popped a hole in the tab and put ribbon through each one.
:)
I use this cheapo stand to hold the binder up while I’m cooking/baking.
It sits on my counter for easy viewing.
1
I’m so glad to have this binder (almost) done.  Today, I think I’ll type up a couple more of our favorites to add.

Create a favorite recipe binder for yourself or for a friend, mom, co-worker, bridal shower or wedding gift, etc. This would make a GREAT gift for anybody!  AND you can print the printable pages as many times as you'd like, so you can create organized recipe binders as gifts (FOR personal USE only) as many times as you'd like!

Again, you can find the recipe organizing printables HERE:


May you be a little inspired!
Until next time,

DaNita
Linking to some of my favorite parties.

Home Tour

Project Gallery